Ok my patient mates, heres some photographic evidence of my work on the boat last week before I left for self-imposed exile at work.
First, I finally got that bedamned daggerboard trunk glued up. Somehow, I wasnt forward thinking enough, and I glassed up the daggerboard without really giving much thought to how it fit in the already made trunk. Well, I did but discounted further planing on of the daggerboard and decided that I was done with all the planing and sanding thank-you-very-much and whatever I had, I had.
This was most unfortunate, because I few more minutes of planing would have produced a superior quality board, and it would have fit in my daggerboard case. So then I was stuck with the project of widening my case, but only by 2-3mm at most because really, all I needed was 1-2mm.
Fortunately, I found 3mm Okoume marine plywood at Goose Bay Lumber, and cut it to fit over the framing for the trunk. This widened the trunk appropriately. Here is the widening sequence in pictures:


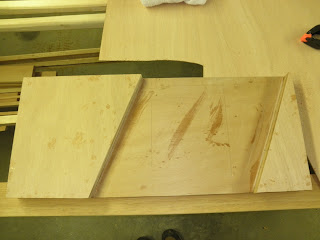

Very self-explanatory, I think.
Next, I still struggle with the hardward issues for the rudder and transom gudgeons. I dont know how Im going to get this rudder assembly attached to the boat. The problem is that the hole to accomodate the tiller does not have the vertical clearance required to use a gudgeon-pintle scheme, which is by far the most convenient. I toyed around with it and thought about enlarging my tiller-hole, but my pintle arms didnt fit around the rudder cassette. A second order of larger, more heavy-duty gudgeons for rudder and transom fit great, except not with each other, and the arms were too long for the spacer in the cassette... A rod pushed through the gudgeons would not have fit cleanly and I would have had a clunky feeling rudder, the round peg in an oval opening thing, if you can visualize that. So I still sit, wondering how I will fix this conundrum. Many people have done it successfully, but Im still hunting around for the best hardware.
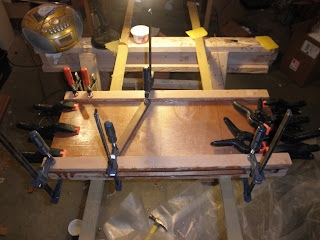
Because of all this drama, I have delayed gluing on the rear seat. I got tired of having it loose, and glued it on before I left. Here, yet again, is my "Forest of Bricks" holding it all down.

And the gratuitous parting shot:

First, I finally got that bedamned daggerboard trunk glued up. Somehow, I wasnt forward thinking enough, and I glassed up the daggerboard without really giving much thought to how it fit in the already made trunk. Well, I did but discounted further planing on of the daggerboard and decided that I was done with all the planing and sanding thank-you-very-much and whatever I had, I had.
This was most unfortunate, because I few more minutes of planing would have produced a superior quality board, and it would have fit in my daggerboard case. So then I was stuck with the project of widening my case, but only by 2-3mm at most because really, all I needed was 1-2mm.
Fortunately, I found 3mm Okoume marine plywood at Goose Bay Lumber, and cut it to fit over the framing for the trunk. This widened the trunk appropriately. Here is the widening sequence in pictures:
Very self-explanatory, I think.
Next, I still struggle with the hardward issues for the rudder and transom gudgeons. I dont know how Im going to get this rudder assembly attached to the boat. The problem is that the hole to accomodate the tiller does not have the vertical clearance required to use a gudgeon-pintle scheme, which is by far the most convenient. I toyed around with it and thought about enlarging my tiller-hole, but my pintle arms didnt fit around the rudder cassette. A second order of larger, more heavy-duty gudgeons for rudder and transom fit great, except not with each other, and the arms were too long for the spacer in the cassette... A rod pushed through the gudgeons would not have fit cleanly and I would have had a clunky feeling rudder, the round peg in an oval opening thing, if you can visualize that. So I still sit, wondering how I will fix this conundrum. Many people have done it successfully, but Im still hunting around for the best hardware.
Because of all this drama, I have delayed gluing on the rear seat. I got tired of having it loose, and glued it on before I left. Here, yet again, is my "Forest of Bricks" holding it all down.
And the gratuitous parting shot:


